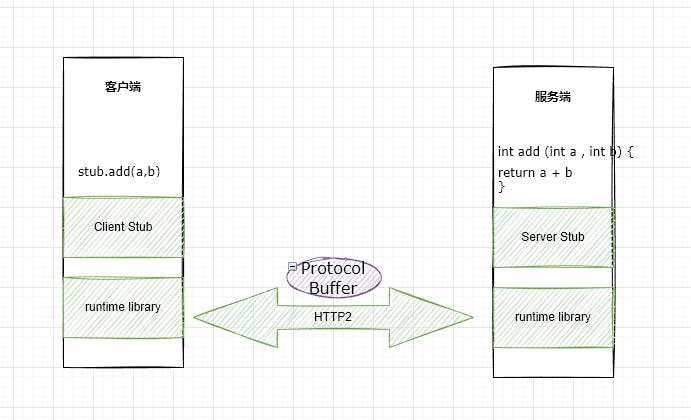
gRPC 是 Google 开源的一套语言无关基于HTTP2协议的 RPC 框架,其中 Java 的实现称为 grpc-java,代码地址在 github.com/grpc/grpc-java。
RPC (remote process call)的含义是程序执行本地的一个方法(看上去像本地执行),实际上会在远程程序代码内执行,这个过程会涉及到网络通讯和传输协议。gRPC作为 RPC 一种实现,传输的网络协议是HTTP2,传输的内容按照 Protocol Buffer 进行编码,并且支持各种语言的实现。

概述
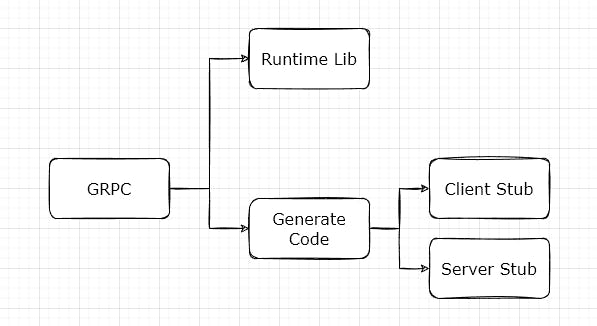
grpc-java 是一个 RPC 库和框架,运行在 JDK 8 上,项目包括两部分:代码生成和运行库。 代码生成由C++编写,用于生成一部分Java 代码, 生成的部分,称为 stub,包括 client stub 和 server stub。 运行库由Java 编写,Java 项目可以引用这些运行库。

在了解 stub 和 运行库的内容之前,运行一个完整的例子,把它运行起来。
gRPC 实例
创建一个 Maven 作为项目管理工具的 Java 项目。
添加依赖
把 grpc 的 运行库 都加进来
<dependencies>
  <dependency>
    <groupId>io.grpc</groupId>
    <artifactId>grpc-netty-shaded</artifactId>
    <version>1.48.1</version>
    <scope>runtime</scope>
  </dependency>
  <dependency>
    <groupId>io.grpc</groupId>
    <artifactId>grpc-protobuf</artifactId>
    <version>1.48.1</version>
  </dependency>
  <dependency>
    <groupId>io.grpc</groupId>
    <artifactId>grpc-stub</artifactId>
    <version>1.48.1</version>
  </dependency>
  <dependency> <!-- necessary for Java 9+ -->
    <groupId>org.apache.tomcat</groupId>
    <artifactId>annotations-api</artifactId>
    <version>6.0.53</version>
    <scope>provided</scope>
  </dependency>
</dependencies>
代码生成插件
为了能 生成代码,也就是生成Stub, 添加 maven 插件
<build>
  <extensions>
    <extension>
      <groupId>kr.motd.maven</groupId>
      <artifactId>os-maven-plugin</artifactId>
      <version>1.6.2</version>
    </extension>
  </extensions>
  <plugins>
    <plugin>
      <groupId>org.xolstice.maven.plugins</groupId>
      <artifactId>protobuf-maven-plugin</artifactId>
      <version>0.6.1</version>
      <configuration>
        <protocArtifact>com.google.protobuf:protoc:3.21.1:exe:${os.detected.classifier}</protocArtifact>
        <pluginId>grpc-java</pluginId>
        <pluginArtifact>io.grpc:protoc-gen-grpc-java:1.48.1:exe:${os.detected.classifier}</pluginArtifact>
      </configuration>
      <executions>
        <execution>
          <goals>
            <goal>compile</goal>
            <goal>compile-custom</goal>
          </goals>
        </execution>
      </executions>
    </plugin>
  </plugins>
</build>
grpc 接口描述
需要写一个描述文件 src/main/proto/hello.proto,按照protocol buffer的语法,定义 方法的名称和参数的数据格式。
代码生成插件,读取 hello.proto,生成 stub
syntax = "proto3";

option java_package = "org.shalk.grpc";

message Info {
  int32 id = 1;
  string name = 2;
  bool ready = 3;
}

service Hello{
  rpc echo(Info) returns (Info);
  rpc clientStream (Info) returns (stream Info);
  rpc serverStream (stream Info) returns (Info);
  rpc biStream (stream Info) returns (stream Info);
}
生成代码
mvn compile
编写服务端代码
服务端需要写两部分代码,server stub implement (服务端 stub 实现)和 server start (服务端启动)
服务端 stub 实现,就是对rpc echo(Info) returns (Info); 的实现。
服务端启动,是启动一个端口,对外提供网络服务,这样客户端就可以通过网络请求把请求数据发过来,服务端在执行完请求后,把执行结果发送回去。
//  服务端 stub 实现
public class HelloImpl extends HelloGrpc.HelloImplBase {
    @Override
    public void echo(HelloOuterClass.Info request, StreamObserver<HelloOuterClass.Info> responseObserver) {
        System.out.printf("request info Id:%d\n", request.getId());
        responseObserver.onNext(request);
        responseObserver.onCompleted();
    }
}
服务端启动
import io.grpc.Server;
import io.grpc.ServerBuilder;
import java.io.IOException;

public class SimpleServer {
    public static void main(String[] args) throws IOException, InterruptedException {
        Server server = ServerBuilder.forPort(8080).addService(new HelloImpl()).build();
        server.start();
        System.out.println("server started");
        server.awaitTermination();
        System.out.println("server stoped");

    }
}
编写客户端代码
客户端需要些两部分代码,client stub initial (客户端 stub 初始化) 和 client stub call (客户端 stub 调用)
import io.grpc.Channel;
import io.grpc.ManagedChannelBuilder;

public class SimpleClient {
    public static void main(String[] args) {
        // 客户端 stub  初始化
        Channel channel = ManagedChannelBuilder.forAddress("localhost", 8080).usePlaintext().build();
        HelloGrpc.HelloBlockingStub helloBlockingStub = HelloGrpc.newBlockingStub(channel);
        // 客户端 stub 调用
        for (int i = 0; i < 100; i++) {
            HelloOuterClass.Info request = HelloOuterClass.Info.newBuilder().setId(i).setName("hi").setReady(true).build();
            HelloOuterClass.Info response = helloBlockingStub.echo(request);
            System.out.printf("get response A:%d\n", response.getId());
        }
    }

}
运行
服务端先启动,客户端运行可以看到结果
get response A:96
get response A:97
get response A:98
get response A:99
整体架构
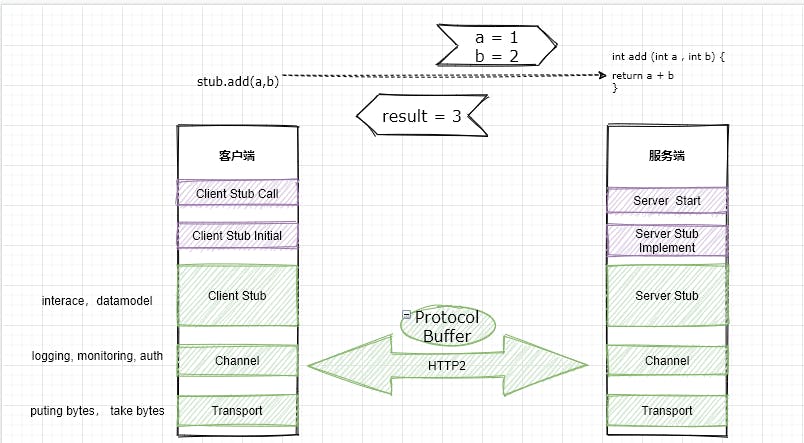
整体架构,纵向上,gRPC可以分为 服务端和客户端,横向上,可以划分为传输层,通道层 和 Stub 层三层。第一层,Stub 层 是提供给开发者的接口和数据模型,这个和proto 文件描述的是一致的。第二层,通道层(Channel)是在传输层之上,提供给Stub 层用的。主要作用是做一些拦截器和装饰器,一般通信传输会做一些拦截,可以做 日志,权限和监控等等。第三层,传输层是用于接收和发送数据的层次,它的接口一般不对外暴露。

一次调用的时序
回顾前面的示例代码,客户端 helloBlockingStub 的一次调用,服务端响应请求。第一步,请求从客户端的Stub层,依次穿过客户端的通道层,传输层,到达网络上。其次,数据通过网络到达服务端的传输层,依次穿过服务端的通道层,最后到达Stub 层 ,也就是服务端的实现。最后,服务端的实现中Stub 响应结果,逆向把数据传输到客户端的Stub 层。
客户端发送请求
- stub 执行echo 方法
- echo 方法 执行静态方法blockingUnarycall
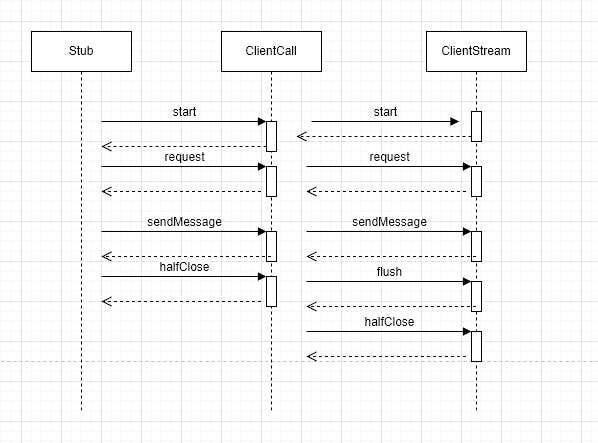
- blockingUsnaryCall中,构造了一个ClientCall,ClientCall 准备了了一个listenablefuture,等Listenablefuture 状态是Done,就把结果从ListenableFuture 中返回。
- 准备listenableFuture时,DelayedClientCall 里准备了 四个pendingRunnables 的任务等待执行。 5 等待状态时Done的时候,exector.waitAndDrain 把这四个任务拿到,分别执行一下。
- 任务1 realCall.start(finalListener, headers);
- 任务2 realCall.request(numMessages);
- 任务3 realCall.sendMessage(message);
- 任务4 realCall.halfClose();
- DelayedClientCall 代理 realCall, realCall 是ClientCallImpl
11 realCall 代理 ClientStream , clientStream 有接口
void start(ClientStreamListener listener);void request(int numMessages);void writeMessage(InputStream message);和halfClose()12 ClientCallImpl 中又把这四个方法,代理给 Stream,Stream的类型是 RetriableStream 13 RetriableStream 又执行过程创建DelayStream,代理给DelayStream 14 DelayStream 又创建四个任务。 (request,writeMessage,flush 和 halfCLose) 15 DelayStream 把任务代理给realStream,这个realStream 是 NettyClientStream
整理来看 Stub 把请求传给了ClientCall, ClientCall 传给了 ClientStream
ClientStream 有Netty 的实现,内部会把数据传输到网络上。
这里面Transport 和 Framer 的逻辑还没明白,第一篇大概就先看到这里。

服务端接收请求
类似的,服务端也有 ServerCall 和ServerStream, 并且把deramer 解数据的任务扔到线程池。 deframer 把解开的数据,找到listener,执行到 Stub 的实现里,数据送达。
ServerCall => ServerStream => Deframer
服务端回复响应
类似于客户端发请求
客户端接收响应
类似于服务端收请求
Next
一次调用中,客户端和服务端处理请求的过程,可以按照层次和时许,把过程梳理更清晰一点。
下一篇文章,将深入客户端发送请求,把客户端中 ClientCall 的作用,ClientStream的作用,时序线程池,以及Netty 怎么把数据发送出去,以及数据包的格式 细致的展开写一写。

